How to Set Up a Proxy in AdsPower with Proxyca
24 Sep, 2026


To set up a proxy in AdsPower, add your Proxyca connection details to a browser profile, select the matching protocol, and run a connection check. Then open the profile and verify its public IP before starting your work.
This guide covers the setup process, explains which credentials go into each field, and helps you troubleshoot connection problems.
Before you start
Have AdsPower installed and your Proxyca proxy details ready. You’ll need the server address, port, supported protocol, and authentication credentials. Copy these from your proxy order rather than using the login details for your AdsPower account.
1. Get your Proxyca connection details
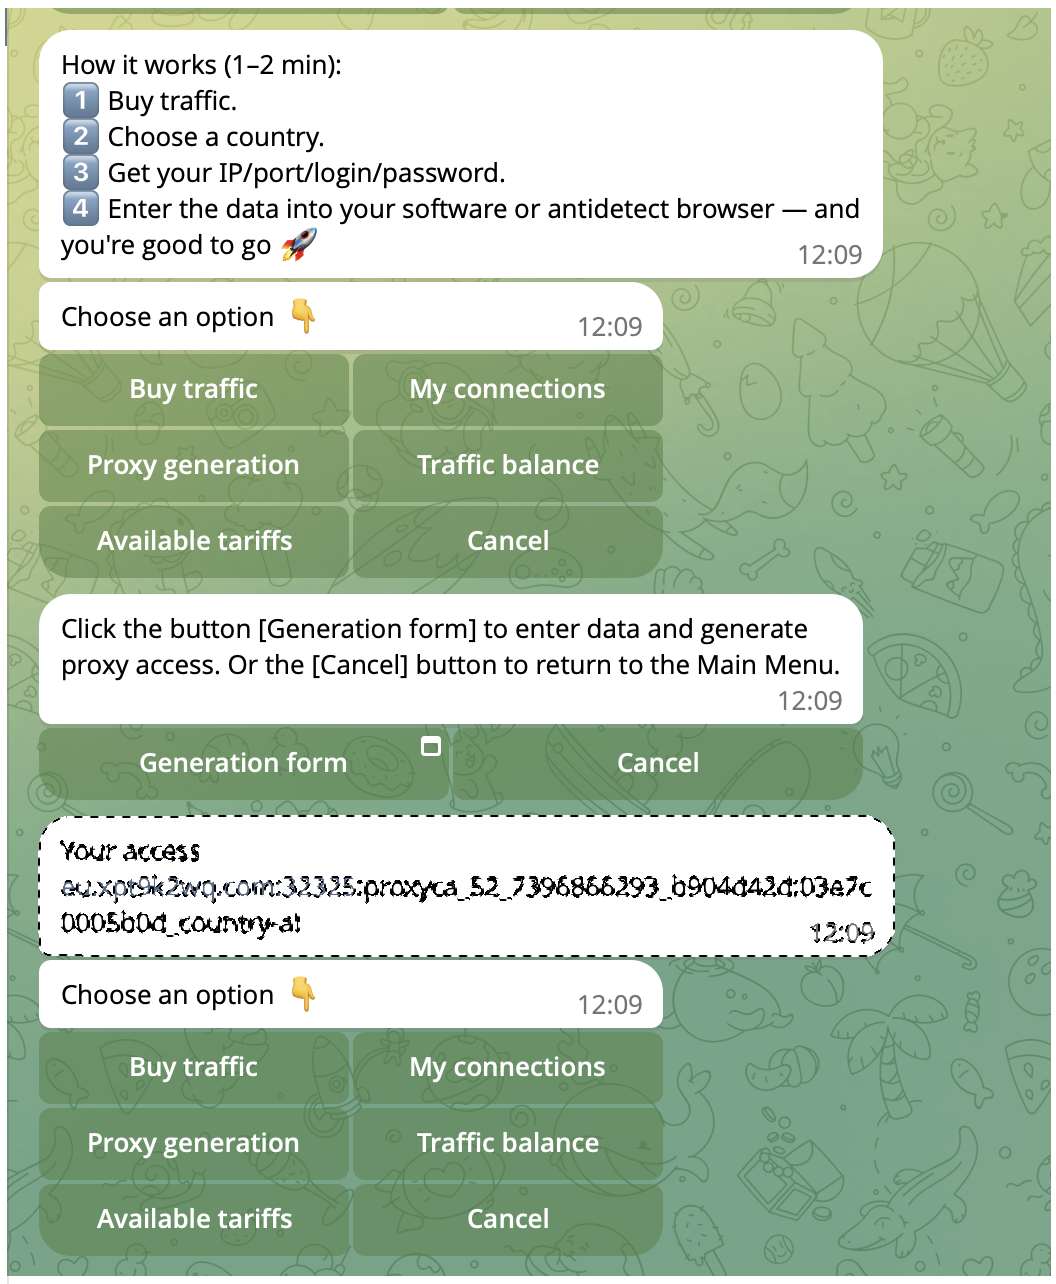
Open the Telegram bot linked on the Proxyca website and retrieve the connection details for your active proxy order.
Keep this information available while setting up the browser profile:
| Connection detail | What you need |
|---|---|
| Host | The proxy server’s IP address or hostname |
| Port | The connection port supplied with your proxy |
| Protocol | The protocol supported by that endpoint |
| Username | Your proxy authentication username |
| Password | Your proxy authentication password |
The host identifies the server you connect to. The port and protocol tell your application how to connect. Your username and password authenticate access to the proxy.
Use the values supplied together for the same endpoint. Don’t combine a host from one order with credentials from another.
2. Create a browser profile in AdsPower
In AdsPower, click New Profile and give the profile a descriptive name, such as Proxyca connection test.
Go to the Proxy section and select Custom. This lets you enter connection details from your proxy provider. These steps follow AdsPower’s official profile creation guide.
A clear profile name makes later testing easier. For example, use the project name and intended location rather than a generic label such as “Profile 1.”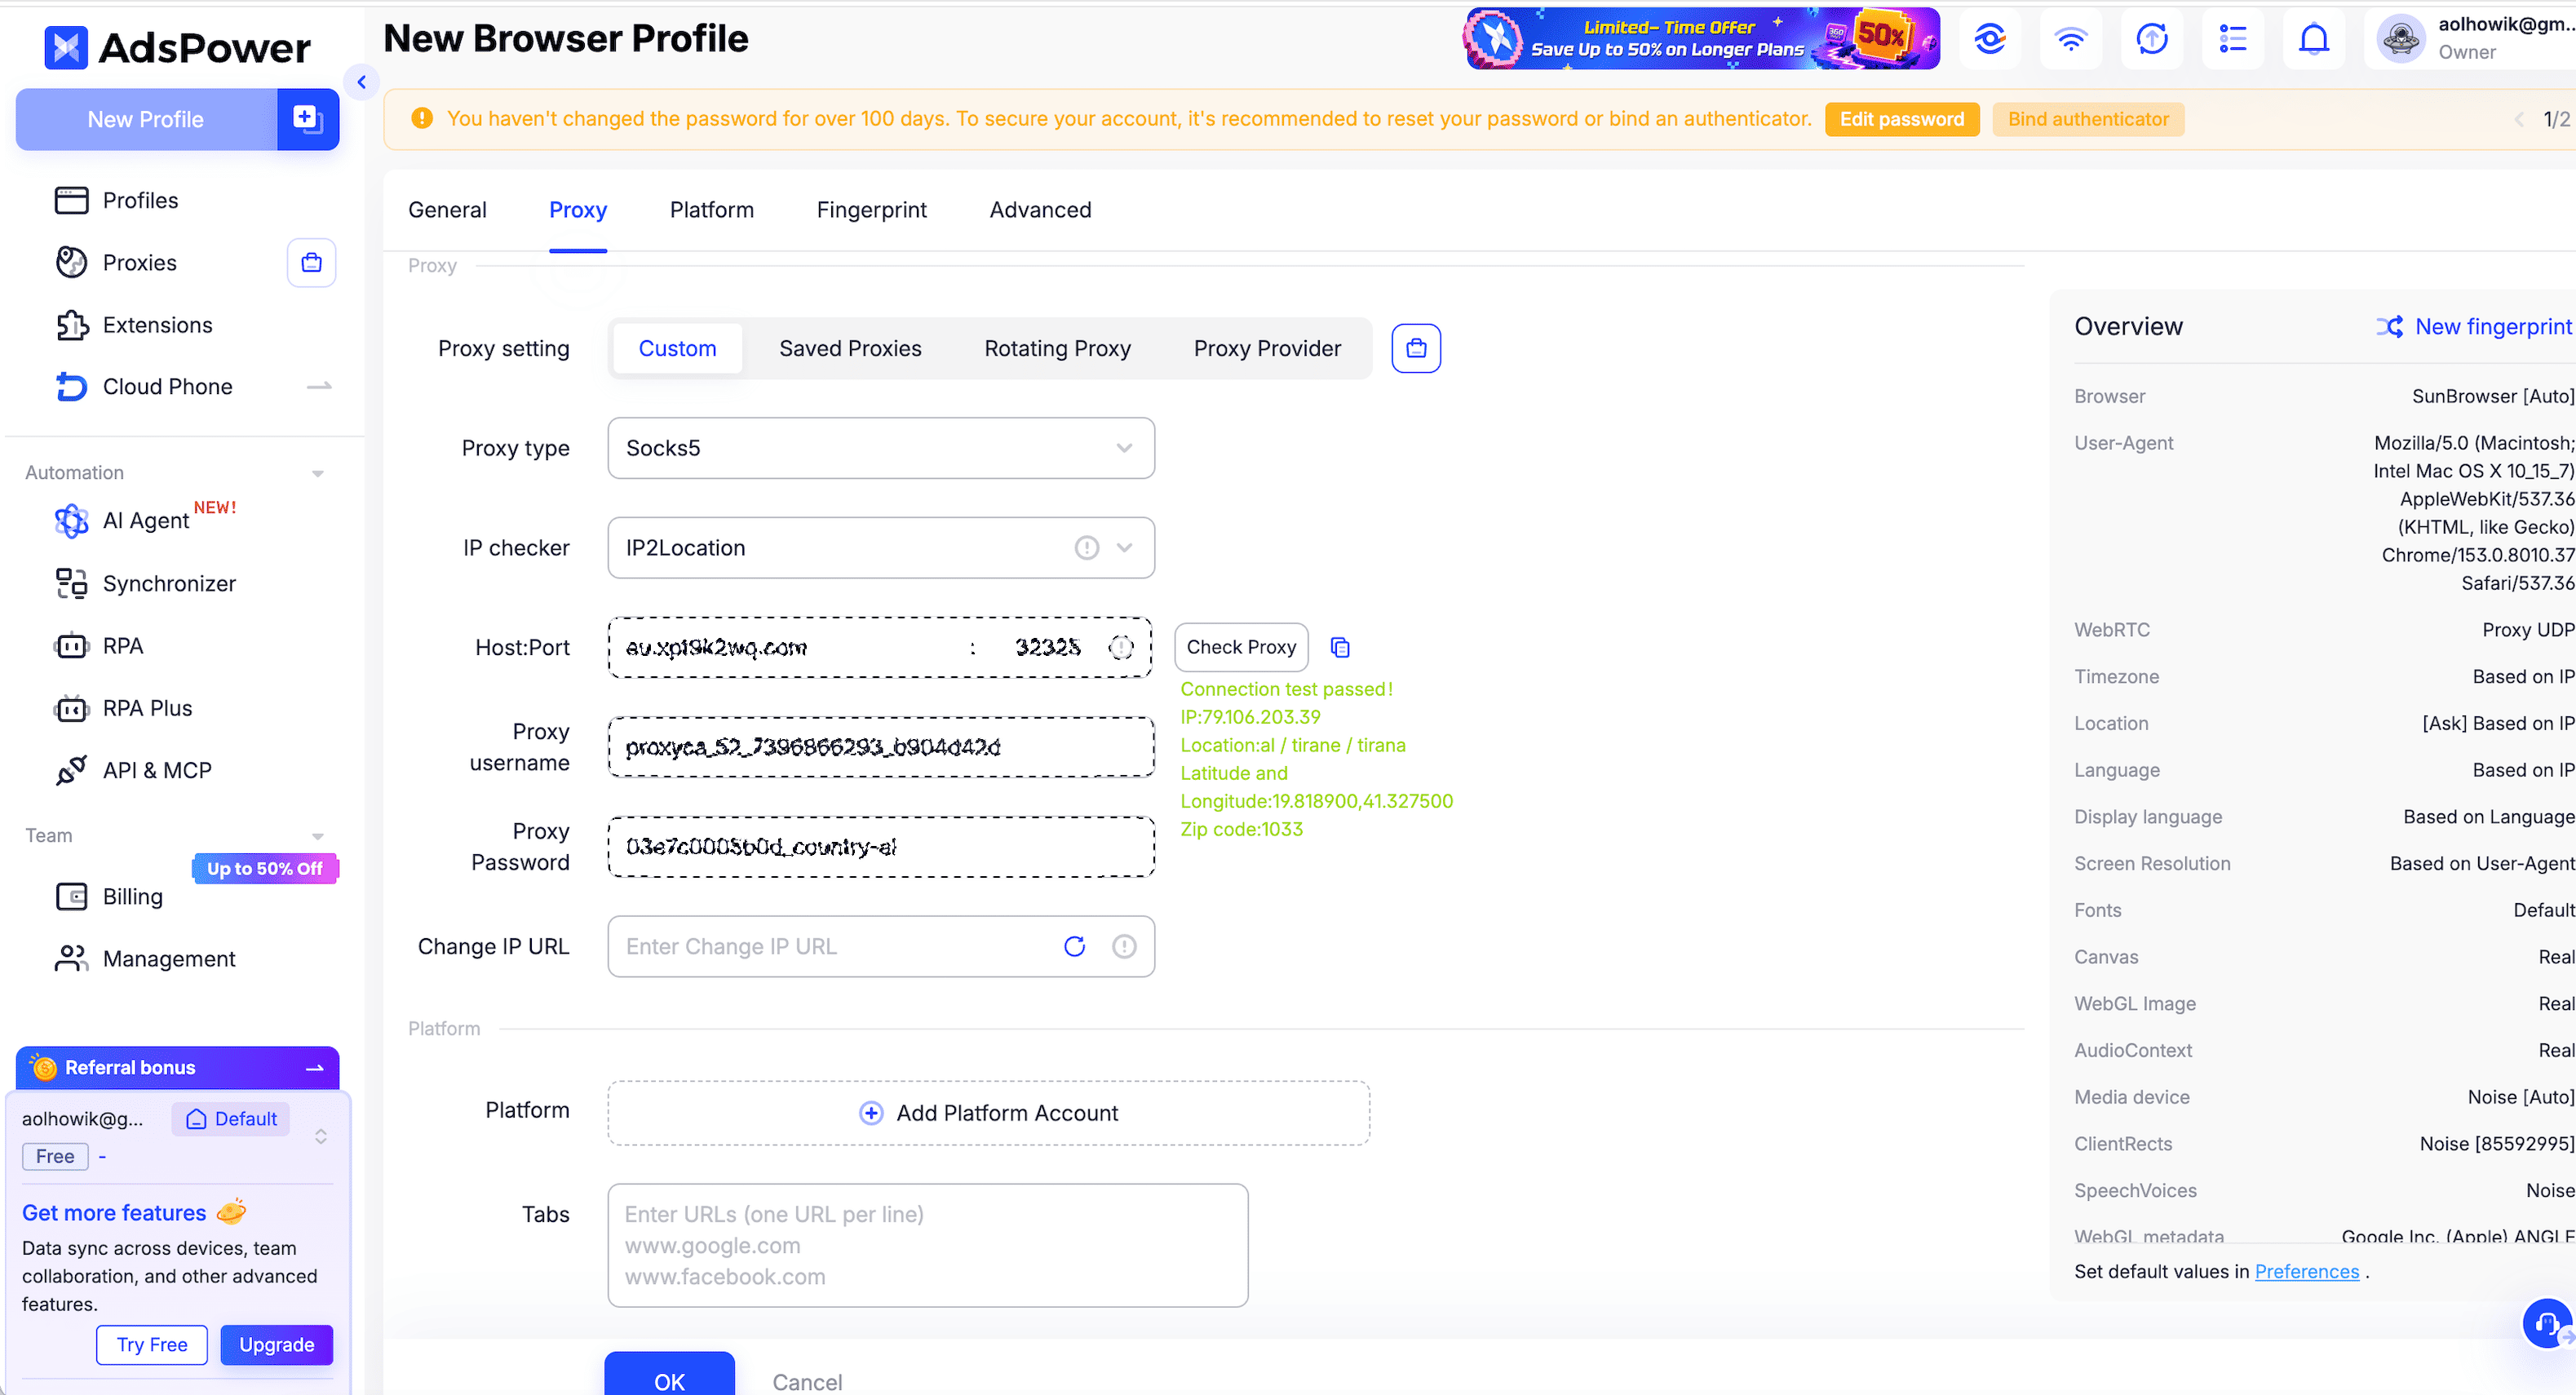
3. Enter your proxy settings
Select the protocol specified in your Proxyca connection details. AdsPower supports HTTP, HTTPS, and SOCKS5, among other connection types. Your selection must match the endpoint you’re using. See AdsPower’s proxy protocol documentation.
Fill in the connection fields:
| AdsPower field | Value to enter |
|---|---|
| Proxy type | The protocol supplied for your endpoint |
| Host:Port | Your proxy server address and port |
| Proxy username | Your proxy username |
| Proxy password | Your proxy password |
For supported formats, AdsPower can also populate fields when you paste a connection string into Host. Its documentation gives the format IP:port:username:password. Review the populated fields before continuing.
Check for extra spaces, missing characters, or credentials pasted into the wrong field. If automatic parsing produces an unexpected result, enter each value separately.
4. Check the connection and save the profile
Click Check proxy. A successful result confirms that AdsPower can connect through the supplied proxy. If the test fails, use the troubleshooting section below before continuing.
After a successful check, click OK to save the profile. Find it in the profiles list and click Open.
The built-in test confirms connectivity. It does not guarantee that every website will accept the connection or that a third-party account will remain unrestricted.
5. Verify the public IP inside the profile
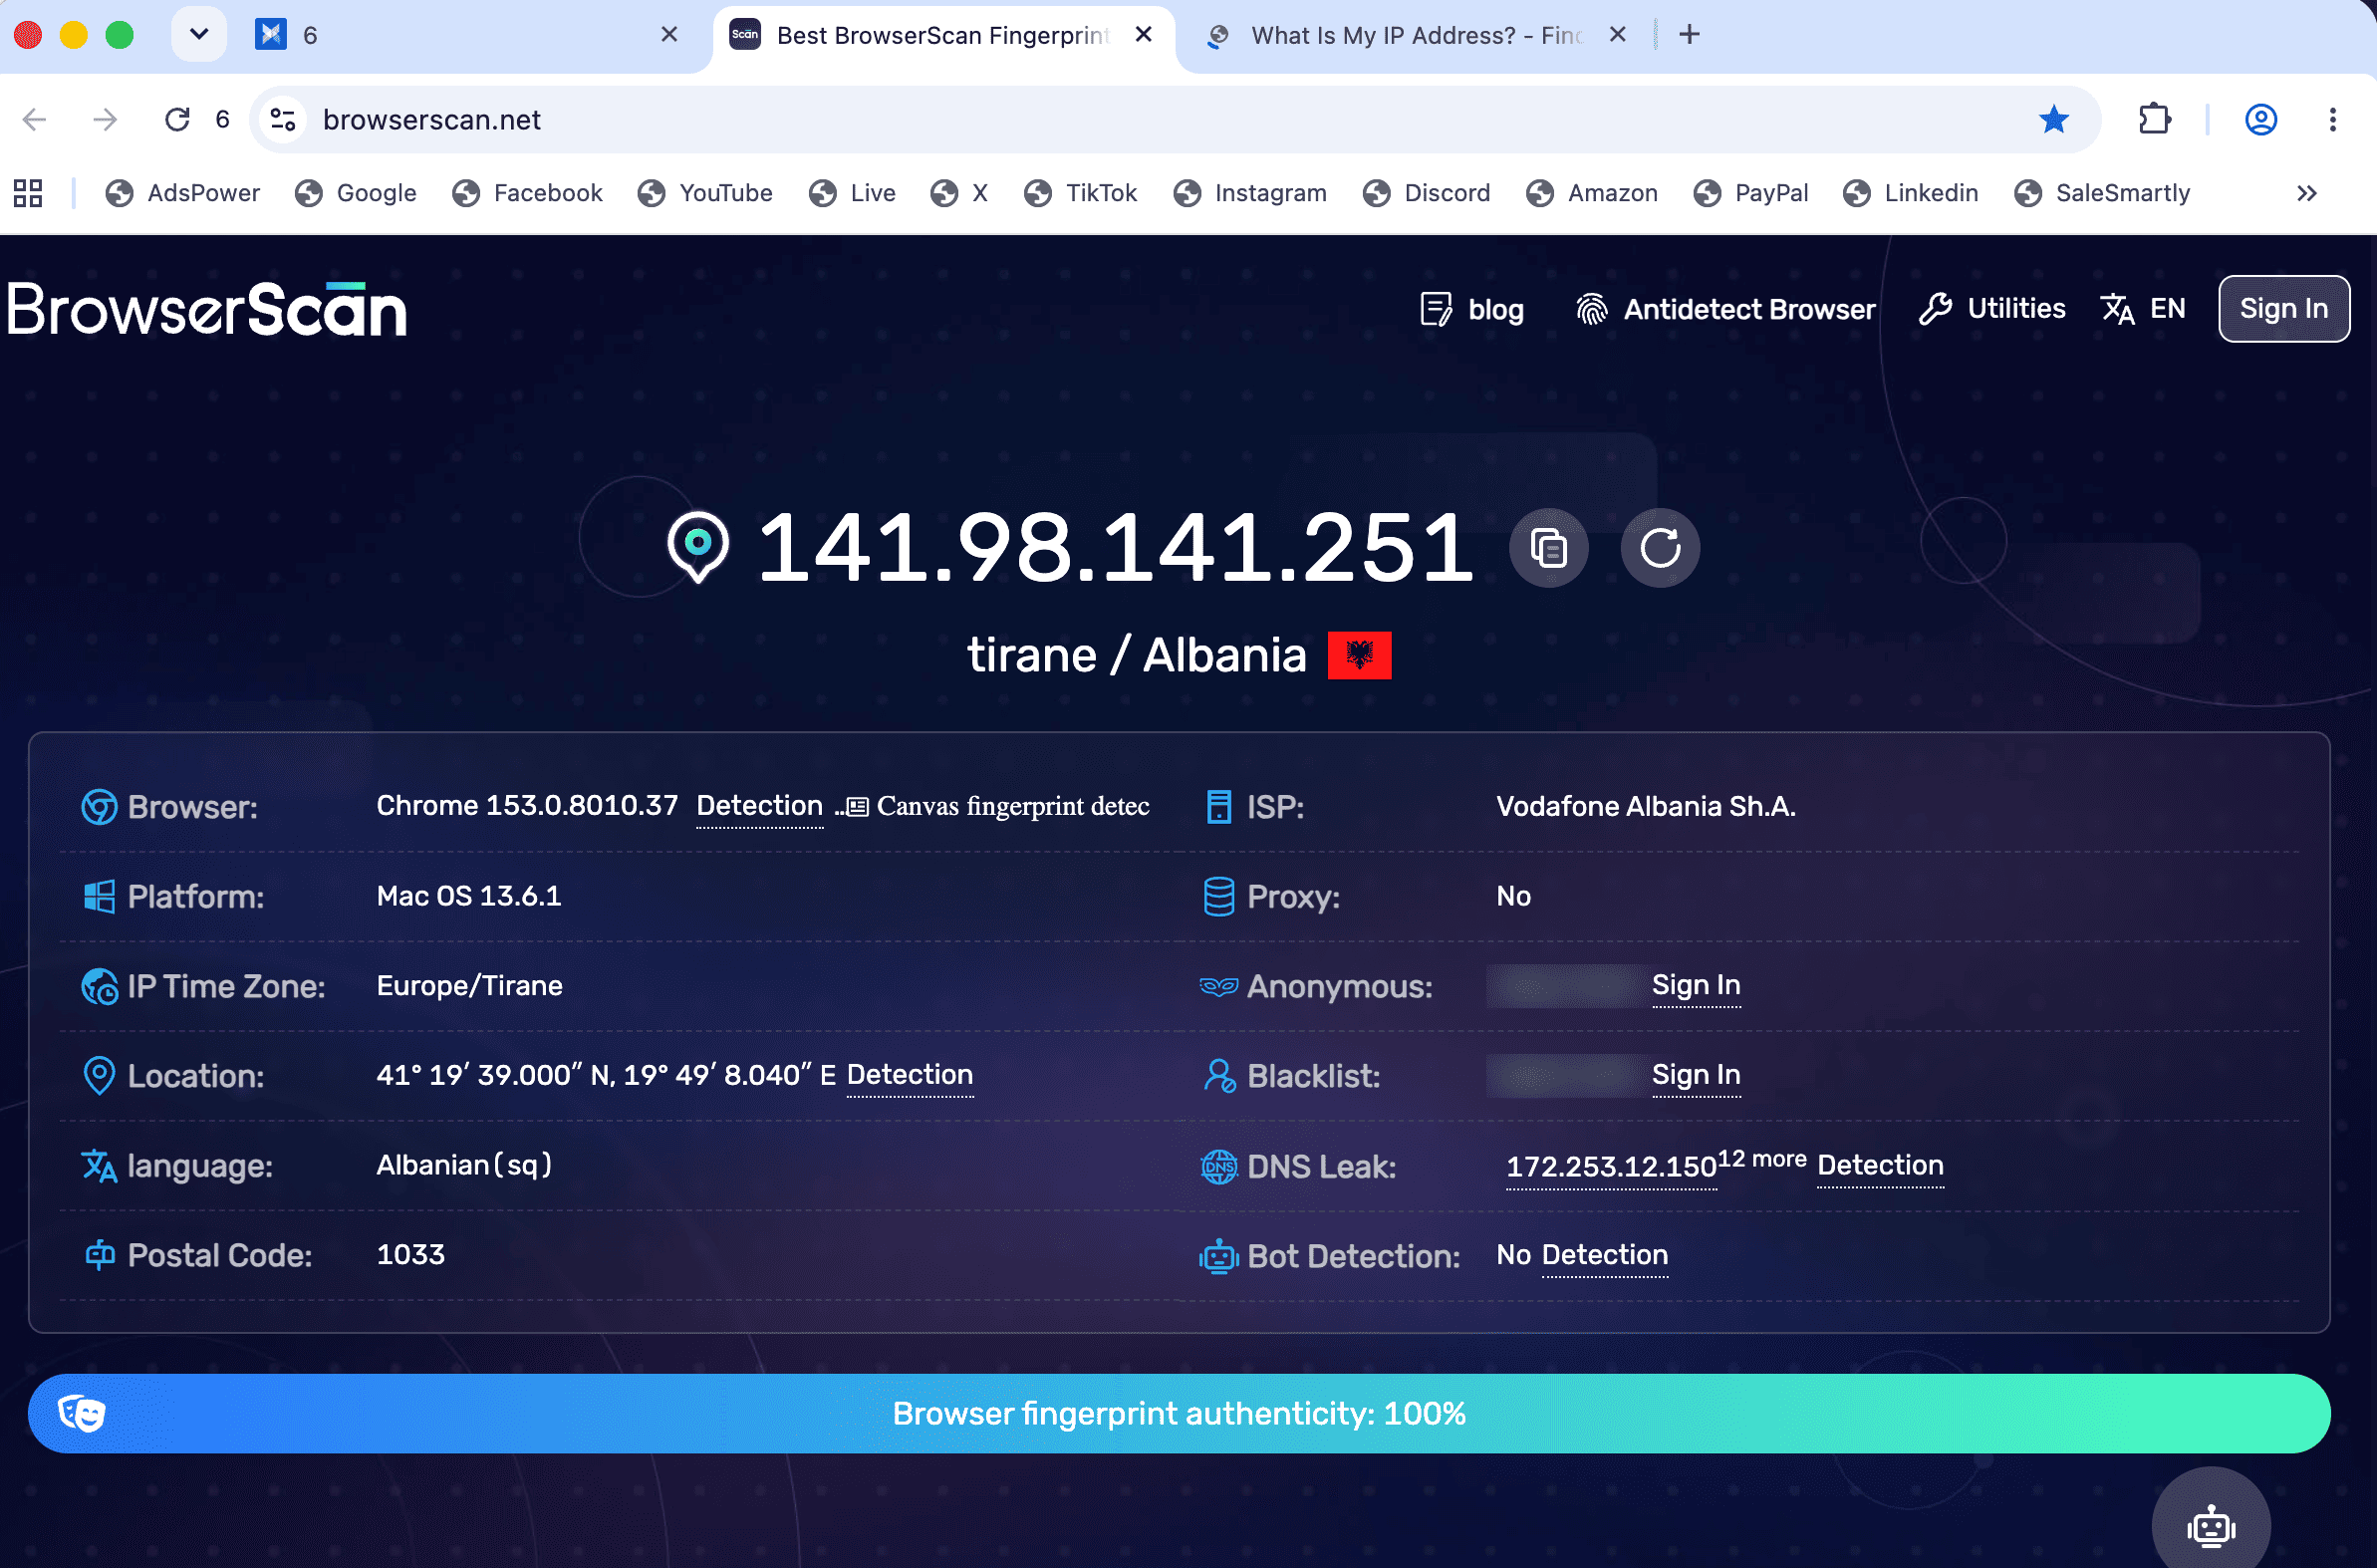
Open an IP-checking page inside the browser profile you just launched. Check the public IP and reported country there, rather than in your regular browser.
This is a separate verification step: the profile’s saved settings show your intended configuration, while the page shows the address observed during an actual browsing request.
Keep a record of:
The profile name.
The time of the check.
The public IP shown.
The reported country.
Whether a normal webpage loads successfully.
For further testing methods, see our guide to checking a proxy.
With IP rotation enabled, the address shown during AdsPower’s connection check may differ from the address displayed later in BrowserScan. Check that the reported country matches the location selected in your proxy settings.
What should you do if the AdsPower proxy connection fails?
Start with the connection details and order status. AdsPower’s proxy troubleshooting guide recommends checking credentials, proxy validity, interference from other network tools, and testing on another network or device.
| What happens | What to check next |
|---|---|
| Authentication fails | Re-enter the proxy username and password |
| Connection times out | Verify the host, port, protocol, and network access |
| A previously working proxy stops connecting | Check whether the order is still active |
| The proxy works on another network | Investigate the original network and local connection settings |
| The connection test passes but one website fails | Record that website’s exact error and check another page |
If a VPN or system proxy is running, check whether it affects the connection. Where appropriate, temporarily disable it and repeat the test.
Change one setting at a time. Otherwise, you may restore connectivity without knowing which change solved the problem.
When contacting support, include the error message, test time, selected protocol, and whether the issue affects all pages or one specific website. Hide passwords in screenshots.
Which proxy should you choose for AdsPower?
Choose according to the connection your workflow needs: location, traffic allowance, and whether the IP should remain fixed or change.
Proxyca offers residential and datacenter proxies. Before ordering, compare the actual plan conditions rather than choosing from the category name alone. Our residential vs. datacenter proxy comparison explains the basic differences.
A useful pre-purchase checklist is:
Is the required location available?
Does the endpoint support the protocol you intend to use?
What traffic or usage limits apply?
How long is access valid?
What IP retention or rotation behavior does the plan provide?
If your workflow depends on keeping the same IP, confirm that condition before purchasing.
Frequently asked questions
Should I select SOCKS5 or HTTP in AdsPower?
Select the protocol supplied for your proxy endpoint. Choosing a different protocol in AdsPower does not change what the proxy server supports. If your order includes several connection options, use the matching address and port for your selection.
Do I use my AdsPower password in the proxy settings?
No. Proxy authentication uses the credentials supplied with your proxy order. Your AdsPower account password belongs to your AdsPower login and should not be entered into the proxy password field.
Do I need to put my proxy credentials into an IP-checking website?
No. Enter the credentials in AdsPower. After opening the configured profile, visit an IP-checking page to see the public address used for the browsing request.
Does a successful proxy check guarantee that my account will not be blocked?
No. It confirms that the connection test succeeded. It does not establish how a third-party platform will evaluate an account, its activity, or compliance with its rules.
Connect your Proxyca proxy
Ready to configure your profile? Open the Proxyca Telegram bot, choose a suitable plan, and retrieve your connection details.
Enter them in AdsPower, run the connection check, and verify the public IP inside the profile before starting your workflow.
